
Editor’s Note: At the author’s request on August 20th, 2015, revisions to this article were made following careful consideration. All changes are denoted in red.
In the first post of this ChIP series, we introduced the reader to the general concept and workflow of chromatin immunoprecipitation (ChIP), and provided advice on planning a ChIP experiment and preparing the necessary reagents. In this post, we will go through a more detailed protocol that we have used in our lab with success that utilized the Covaris S2 for sonication and Dynabeads for immunoprecipitation. Once again, keep in mind that this walkthrough is still just a starting point- as noted throughout, there are many steps that may require extra tweaking to get ideal results.
An Overview of What Happens in Chromatin Immunoprecipitation (ChIP)
Let’s quickly go over the steps of ChIP:
- Cells are fixed in formaldehyde (or some other crosslinking reagent), such that any proteins that are bound to or near DNA are covalently linked to the chromatin. The fixation reaction is then quenched with addition of glycine, and the cells are harvested and spun down in ice-cold PBS.
- A series of washes with nuclear lysis buffers (LB1 and LB2) lyse the cells and allow isolation of the nuclei.
- The nuclei are resuspended in low-SDS shearing buffer, and the chromatin is sheared. For this step, we use the Covaris S2.
- The sonicated lysate is diluted in a buffer containing Triton, which helps to sequester and inactivate the SDS.
- A small portion of this is set aside as “total input”- this aliquot represents what your sample looks like before immunoprecipitation.
- The lysate is pre-incubated with magnetic beads, so if anything in your lysate binds nonspecifically to magnetic beads in the absence of antibodies, you get rid of it in this step.
- The pre-cleared lysate is aliquoted into multiple tubes, each one getting its own antibody. We recommend incubating these overnight at four degrees on a roller or shaker, so that your antibodies have plenty of time to bind to their targets.
- Protein A/G beads, which have also been incubated in a blocking solution at four degrees overnight, are added to the lysates. The Protein A/G beads bind your antibodies, which are bound to your targets, which are in turn bound to sonicated fragments of DNA.
- After a four hour incubation at four degrees, the beads are magnetically precipitated and washed three times in three different buffers. In theory, these washes remove everything that binds weakly or nonspecifically to your beads, and only the relevant fragments of DNA that are bound by your target will remain.
- Your enriched fraction of DNA is eluted from the beads by incubating them with proteinase K, which shreds the proteins and frees the DNA to diffuse into solution.
- The DNA libraries decrosslink at 65 degrees for eight hours.
- The libraries are cleaned up via column preps or DNA precipitation.
- From here, the libraries are ready for analysis by real time PCR or next gen sequencing.
Sounds simple, right? In many instances the procedure is fairly straightforward, but for some applications it can be highly challenging. The next few sections will walk you through the finer points of our ChIP protocol.
Fixing the Cells
How many cells should you fix? This is a difficult question and depends on a number of factors. It partly depends on your cell line, your antibody, and your target. Targets that are highly abundant in cells will probably not require as many cells as targets that are expressed at very low levels. Likewise, if your antibody is not very good, you will probably need more cells to get a reliable answer. The only way to figure it out is empirically. I recommend starting with about 30 million cells per target- probably overkill for some applications, but a safe place to start. Take into consideration that, especially for a first run, you will want to have enough cells for your target(s), plus a positive and negative control- more on that later.
Start by pre-chilling a bottle of PBS to four degrees and, if necessary, cooling a centrifuge down to four degrees. Wash your cells once or twice with room temperature PBS. You should have prepared a 1% formaldehyde solution- add 20 mL per T175 flask of adherent cells. If you have suspension cells, use 20 mL per 20 million cells. Incubate at room temperature for 10 minutes, gently swirling once or twice during that time. Inactivate the formaldehyde by adding 1 mL of 2.5 M glycine, again waiting for five minutes at room temperature. Dispose of this solution responsibly- formaldehyde solutions are not suitable for the sink.
The crosslinking reaction is one of the many steps that can be optimized for your particular application- for instance, varying either the time spent in formaldehyde or the concentration of formaldehyde, as these two parameters will determine the extent of the crosslinking. Under-crosslinking may mean that your target is rarely or weakly crosslinked to the DNA; over-crosslinking may mean that your antibody will no longer bind to its target protein. For most of our applications, 1% formaldehyde for 10 minutes works well, but if you are having problems you can try 0.5, 1, or 2 % formaldehyde, or 5, 10, or 15 minutes.
Now that your cells are “frozen in time” from the crosslinking, you don’t want the fixation reaction to go further, or for your samples to degrade at room temperature. You also want to make sure that each of your samples are fixed identically. So from here on out, you want to do everything on ice or at four degrees. It is critical to keep all your samples cold for the remainder of the procedure. Don’t let your ChIP warm up until the final elution step from the beads. Wash the cells once with the ice-cold PBS you pre-chilled earlier, then add 5-10 mL of cold PBS per flask and scrape the cells with a cell scraper. Transfer to conical tubes and pellet the cells in your four degree centrifuge- five minutes at 400g should do it.
After removing the supernatant, resuspend your cells in about 5 mL of LB1, incubate on ice for 15 minutes, gently swirling a few times during that incubation, and then pellet by spinning again at about 1500g for 10 minutes. Again aspirate the supernatant and resuspend in 5 mL of LB2, incubate on ice for 15 minutes as before, and spin down again at 1500g for 10 minutes. Resuspend the pelleted nuclei in an appropriate amount of shearing buffer- about 500 uL per 20 million cells. Be sure that LB1, LB2, and the shearing buffer are supplemented with protease inhibitor and, if applicable, phosphatase inhibitor.
In earlier ChIP experiments we performed in our lab, we would use this as a convenient stopping point, snap-freezing the lysates and storing them at -80 degrees. The freeze-thaw cycle didn’t seem to impact our IPs for many targets- for instance, AR enriched very nicely whether the samples were frozen or not- but for some targets, especially phosphorylated Pol II, freezing the sample obliterated any enrichment. So I highly encourage you not to freeze-thaw the lysates if you don’t have to do it, especially if you are targeting something unstable or uncharacterized. Instead, start immediately with the chromatin shearing.
Chromatin Shearing
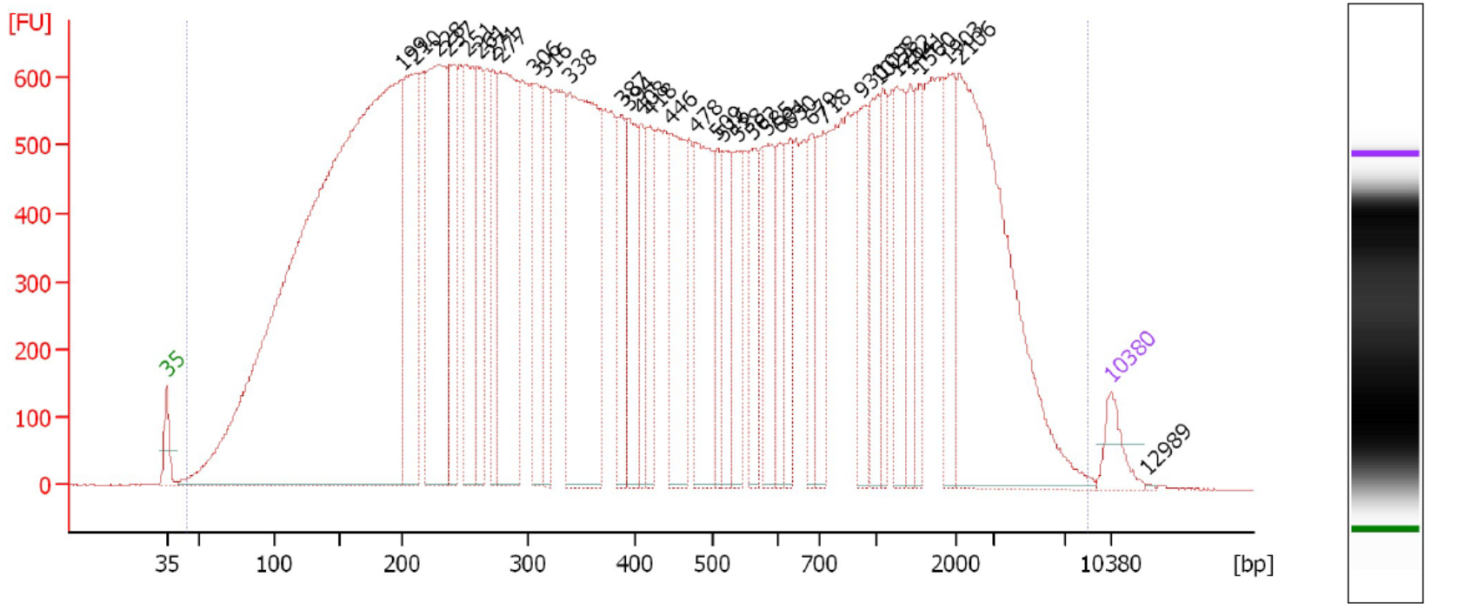
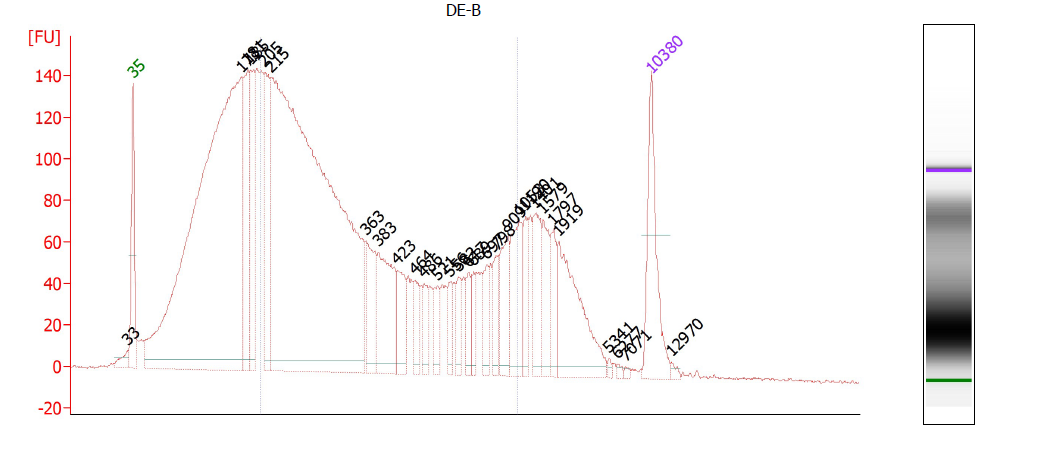
This is a critical step and one especially prone to difficulties. On one hand, you don’t want to under-shear your samples, because then you will have lots of high-molecular weight chunks of DNA (Fig. 1). You will still pull down the DNA that your target binds- but you will also be pulling down hundreds or thousands of bases that flank that region. This means that your ChIP will not be very specific. On the other hand, you don’t want to overshear the DNA either, because then you run the risk of denaturing or degrading your target protein, and ultra-tiny fragments are often difficult to analyze by RT-PCR (Fig. 2). For instance, you won’t be able to interrogate real time PCR amplicons over 100 bp, and smaller fragments may not bind to purification columns as easily as larger ones. For a well-sheared library, see Figure 3.
 We use the Covaris S2 for chromatin shearing. The Bioruptor is often the more popular choice, but both systems will work well, as long as you prep your samples properly. You can also use a probe sonicator, but that’s much more difficult to deal with, and much less reproducible. Unless you absolutely have no other option, I would not use a probe sonicator for ChIP.
Before doing a full ChIP, I recommend harvesting an extra flask of cells just to optimize the shearing. Ideally, you can harvest this flask alongside all the others, and then snap-freeze it as a separate aliquot. That way, you are virtually 100% certain that the sonication protocol will work identically for your “real” samples as it did for the “practice” sample upon which you did the optimization.
Prior to embarking on a full ChIP experiment, I highly recommend fixing and harvesting a flask of your cells and performing a shearing “trial” to optimize sonication. This sucks, but it is much better than charging through a full ChIP and then finding out at the end that your sonication was suboptimal. And unless you’ve done it before, there’s no way to know exactly how many cycles a given cell sample will need under your conditions.
The SDS concentration in your shearing buffer is critical. Again, there is a balancing act here: you want enough SDS to lyse and denature your sample, but not too much that it will interfere with antibody binding later in the procedure. We use 0.2 to 0.4% SDS in our shearing buffer, although many other protocols go considerably higher than that, up to 1% SDS. If you have a robust antibody, or can massively dilute it with dilution buffer, it may not be a big deal, but for sensitive applications it’s worth being mindful of this.
In our experience, shearing with the Covaris can be touchy. When using the S2, it is critical to bring the volume to the very top of the tube. You don’t want to overfill the tube- you want just a little bit of free space in there- but you also don’t want there to be enough free space to allow air bubbles to form. If there is an air bubble at the top of your Covaris AFA tube, then the acoustic energy meant to be directed at shearing your chromatin may instead by directed at swirling or foaming the sample. A little bit of foaming is OK, but if you begin sonication and see your lysate foam like mad, that’s bad. It means that the S2’s energy is getting lost in the foam, and your sonication will suffer. So aim for 1000-1050 uL of lysate per tube, eyeballing it to make sure that the meniscus is just below the rim of the tube. As much as possible, try not to introduce foam or bubbles to your lysate prior to sonication.

The S2 can handle up to 30 million cells per tube, and we usually use between 10 and 20 million per tube. Sonicate for 5, 10, 15, 20, 25, 30, and 35 cycles, taking 10 uL aliquots each time. Replace the 10 ul you remove with shearing buffer so you keep the volume at 1 mL. To each 10 uL aliquot, add 90 uL of elution buffer, 1 uL RNase, and 1 uL proteinase K. Incubate at 37 degrees for 10 minutes, 55 degrees for 10 minutes, and 65 degrees for 3 hours. This abbreviated decrosslinking procedure is fine if all you need to do is check the sonication profile of your sample.
Clean up these aliquots using PCR purification columns- we use the QIAgen PCR Purification Kit, adding sodium acetate, pH 5.2, to the binding buffer to lower the pH as recommended in the manual. Then run your aliquots on a gel or, preferably, the Bioanalyzer. Depending on your application, you want your chromatin to have a predominant peak around 250 bp, without any peaks at higher (1 kb) MWs. It’s often almost impossible to get rid of all the higher MW material, but you want to make sure that the majority of your DNA is low MW.
Once you have a firm idea of how many cycles your sample will need, you can start sonicating your lysates for the real deal. Just be sure that you sonicate using the same conditions, and approximately the same number of cells, that you used for the optimization. If you’d like, you can also take an aliquot of your chromatin after shearing, use the quick decrosslinking protocol above, and within a few hours make sure it checks out before proceeding with the rest of the ChIP.
Dealing with Dynabeads
From here on out, I highly recommend using DNA low-binding tubes, such as from Eppendorf (catalog # 022431021 for 1.5 mL tubes, 022431048 for 2.0 mL tubes). There are a lot of transfers in this protocol, and inevitably some DNA will be left behind on the sides of your tubes. Using low-binding tubes keeps this to a minimum.
Now that your lysates are sonicated, spin them at 16000g at 4 degrees (to pellet insoluble material/lipids). Then add dilution buffer, supplemented with protease/phosphatase inhibitors, to a convenient volume. I recommend using about 2 mL total per antibody, such that if you are planning to ChIP with three antibodies, you would bring the total volume up to 6 mL with dilution buffer. Also at this point, you want to take 200 uL of your diluted lysate as total input.
There are a lot of different protein A/G beads out there- most of them are OK, but Dynabeads are usually the safest and most widely used. We use Dynabeads Protein G beads. If you are wondering whether to go with protein A or G, you can consult this handy chart from NEB.
As you can see, protein G works best for most applications, unless you are dealing with an unusual antibody from an unusual animal.
For each IP, use 30 uL Dynabeads. Usually, it’s not like adding more beads will help much in pulling down more DNA, and in fact it may make things worse, by increasing the surface area of beads available for nonspecific binding. And, Dynabeads are expensive, so don’t use more than you need.
We always like to pre-clear our lysate by incubating it for one hour at four degrees with Dynabeads, so that everything in the lysate that binds the beads nonspecifically will be bound up at this step. For each IP you are planning, use 30 ul Dynabeads. For instance, if you are planning for three IPs, preclear your lysate with 90 uL Dynabeads. It is also important to wash the beads once with dilution buffer before adding them to your lysate; the storage buffer contains chemicals that can cause problems later in the procedure.
Now that your lysate is precleared, precipitate the beads and aliquot the pre-cleared lysate into 2 mL tubes (with 1.8 to 1.9 mL per tube). Each tube then gets its respective antibody and is incubated at four degrees with it overnight, preferably with gently agitation from a shaker or roller. Some antibodies may not require overnight to achieve maximal binding, but some antibodies may, so it’s best to be safe.
How much antibody you add per reaction may require some optimization. For a first run, it’s best to err on the side of caution and use a little more than recommended. If your antibody doesn’t come with a recommended amount for ChIP, try optimizing with 1, 5, and 10 ug per reaction.
Remember to include both a positive and negative control for your ChIP. A good positive control would be an antibody that you know works well- as mentioned previously, histone marks make good positive controls. Your negative control should be rabbit or mouse IgG- or, for a first run, you can just use a “beads only” sample, which is incubated with the Dynabeads overnight without any antibody. This negative control will tell you how much DNA sticks nonspecifically to the beads in the absence of antibody.
Lastly, prepare the beads that you will use the next day for the IP- 30 uL per reaction. (So if you are planning on doing three IPs, prepare 90 uL Dynabeads). It’s probably overkill, but I wash these beads first in 7.5% BSA in PBS from Sigma, then resuspend them in a new volume of 7.5% BSA, then add 10 uL of yeast tRNA per reaction. The volume of 7.5% BSA you resuspend the beads in is not critical- 500 uL is good. Both BSA and yeast tRNA are classic reagents for reducing nonspecific binding. Put your beads alongside your IPs and let them block at four degrees with gentle agitation overnight.
Go home, go to sleep and recharge for round two of ChIP. In the third and final installment of this series, I will go through the remaining steps of the protocol and discuss your options of analysis.
Continue to the final installment of this ChIP series, Part III: Collecting & Analyzing your Libraries.